How To Make Candles For Massage - Simple Steps to Make Candle
Instead of spending thousands of rupees on a spa treatment, you should invest in some high-quality essential oils. You'll then be able to use this recipe to create calming, soothing, and delicious-smelling DIY massage candles to have on hand anytime you need a massage.

Massage candles are made from a blend of soy wax and various skin-soothing oils, and the wax is cold enough to pour directly on your skin for a soothing, spa-like treatment. Massage candles are a great way to spice up your massage sessions while also providing aromatherapy benefits.
How To Make Candles For Massage
This article is for you if you're looking for a simple way to make your candles for massage. Massage oil candles can be created at home with a pure candle making supplies and a little time, and we'll guide you through the process from beginning to end so that anybody can do it.
Massage Candle Supplies:
- Soy Wax Flakes
- Glass Container
- Pre-Waxed Candle Wick
- Coconut Oil
- Shea Butter
- Jojoba Oil
- Frankincense Essential Oil
Know About Massage Candles Making Supplies
Massage candles are interesting in that the soy wax melts slowly and can be poured straight onto the skin to be used as a massage oil. Continue reading to learn more about the supplies needed to make massage candles.
- Soy Wax Flakes: Soy wax flakes is a sustainable natural resource. Soy wax is biodegradable and can be cleaned with just water and soap. Soy candles burn slower and longer than paraffin candles because soy wax has a lower melting point than paraffin wax. Soy wax candles also produce the cleanest smoke.
- Glass Containers: As part of the décor, glass candles look fantastic. Glass candles are frequently used by interior designers to stage any space in the house, including living rooms, baths, and workplaces. They can instantly add sophistication and elegance to any space in your home. Because of the transparency of glass, there is no light barrier, allowing the candle flame to shine through freely.
- Pre-Waxed Candle Wick: Wax Coated Candle Wicks may be used to manufacture a number of different types of candles. These cotton candle wicks are pre-waxed and emit very little smoke, making them perfect for household use. They're also constructed in such a way that they burn for longer, don't curl, and don't leave cotton ashes behind.
- Virgin Coconut Oil: Coconut oil helps exfoliate the outer layer of dead skin cells, smoothing out your skin. When used topically, coconut oil is a superb all-natural 'anti-aging' moisturizer. In addition, coconut oil is high in medium-chain fatty acids, which help your skin retain moisture while looking and feeling silky smooth.
- Shea Butter: Shea butter is commonly found in skin and hair moisturizers, creams, lotions, and other emulsions. It has a high-fat content, making it a good emollient and skin moisturizer. It also possesses anti-inflammatory and antioxidant qualities. These can aid in the reduction of inflammatory skin illnesses as well as the damage caused by free radicals to the skin.
- Jojoba Oil: The oil of jojoba is a humectant. It implies that it helps keep moisture in the skin by forming a protective barrier on the surface. This not only keeps the skin hydrated, supple, and moisturized, but it also keeps germs out of the pores, avoiding infection and acne.
- Frankincense Essential Oil: Frankincense essential oil has astringent properties. This indicates that it is beneficial to skin care since it can aid in the healing of skin flaws and disorders such as acne and wounds. Frankincense has long been used as a therapeutic oil to rejuvenate damaged skin. Stretch marks and scars can be reduced by using this method.
DIY Massage Candles at Home - Step by step
Massage candles can be made with all-natural components for you and your lover or as romantic presents. They're soothing and comforting, and the mix of ingredients is excellent for your skin! Continue reading to learn how to make massage candles step by step for a relaxing evening.
Step 1: Place The Wick

- Make sure the wick is long enough to extend out at least 1/2 inch from the bottom of your candle container. In soy wax candles, the raw wick should only be composed of natural fibers.
- You should get a longer wick than the container in which you'll be burning your candles since it will burn quicker and generate a wax pool faster than a smaller one.
- With a wooden knife, place the wick into the hole of the sustainer once the lengths have been cut. To keep the wick in place, you can use either a conventional size or a little bigger sustainer.
- Slide it down to make sure the wick doesn't protrude from the bottom. By pushing the metal feed at the top of the sustainer with your fingers, fix the wick in place with pliers.
Step 2: Melt Your Wax & Oils

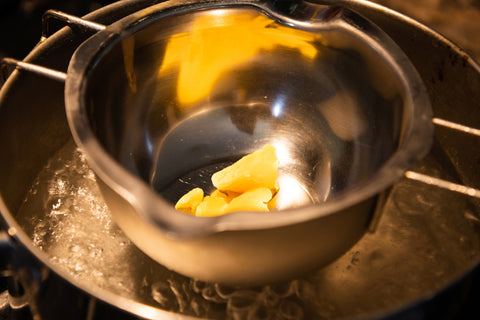
- In a small saucepan, melt the butter, coconut oil, and soy wax over low heat. It's preferable to do this in a double boiler, but you can do it on the stovetop if you keep an eye on it and stir continuously.
- Remove the pan from the heat and set it aside to cool after the oils have completely melted. Before adding the remaining ingredients, the oil must cool to 54°C. While it cools, please move on to the following step.
Step 3: Get The Glass Jar Ready
To position your wicks in your containers, use the wooden chopsticks. If you've used raw wick and it's been in oils, scrape it out with a spatula to get any excess oil out. If you need to contact the wick with your fingers, put on vinyl or latex gloves.
Step 4: Add The Essential Oils

- Add the essential oils and stir everything together until it's completely smooth.
- After the essential oils have been blended in, carefully pour the oils into the containers using the spatula. You can use the wooden skewer to press the wick back into position if it moves during this time. Allow 12 hours for the candles to cool.
Step 5: Finishing Touch

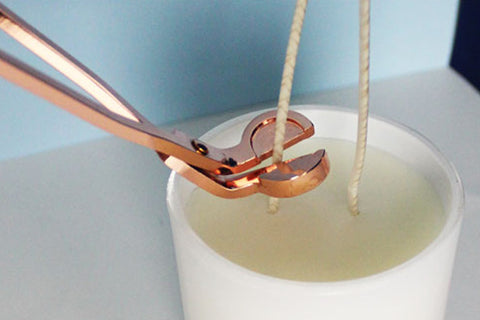
- Trim the wick once the oils have set and the containers are no longer heated. Cut the wick flush with the top of the container with a pair of scissors.
- Wipe the lids and tins clean with a dry, clean cloth. It may be embellished with a ribbon or labels if you want to go all out.
How To Use Candles For Massage?
Step 1: Burn The Candle
Light the candle and let it burn for 5-15 minutes, or until a significant volume of heated oil is formed. During this period, the aroma of essential oils will fill the air.
Step 2: Massage Your Body
Now extinguish the flame. Place the oil in your palm and gently massage the skin. The first time you use the oil, you'll be surprised at how soothingly warm it feels.
Note: If you leave the candle burning for more than 30 minutes, it will begin to heat up. So when you pick it up, be careful. Make sure the oil temperature isn't too high as well.
Conclusion
Massage candles can be a great addition to your self-care routine or even a wonderful date night idea with your partner. It is more pleasurable to apply warm massage candle oil to your skin than to use cold oil. In addition, it aids in muscular relaxation even more.
Your skin will be hydrated and conditioned. The oil of these massage candles contains skin-benefitting ingredients. You should make sure that you only use high-quality candle making ingredients like the ones which can be found here at VedaOils.
You May Also Like:
Buy Products
-
 Golden Jojoba Oil
 -
 Peppermint Essential Oil
 -
 Pre Waxed Candle Wicks - 7 Inch
 -
 Shea Butter
 -
 Yankee Candle Jar - Buy 1 Get 1 Free
Related Articles
-
 How to Make Gingerbread Candles & Their Benefits
 -
 Candle Wax Discoloration : Causes, Prevention, and Solutions
 -
 How to Make Crystal Candle at Home
 -
 Prevent Air Bubbles in Homemade Candles
 -
 How to Fix Candle Sweating - Solutions and Preventive Tips
 -
 DIY Candle Molds from Household Items : Creative Candle Making
Disclaimer :- This article is intended for informational and educational purposes only and should not be considered a substitute for professional medical advice. For specific health concerns or treatment, please consult your personal physician. The article's editor, writer, and VedaOils organization do not assume any responsibility for any health outcomes resulting from the information provided. Readers are strongly encouraged to seek advice from their physician before acting on any recommendations made in these articles.


 Sign in
 Register now
 My Reward Points


